Sending sensor values from Esp8266 to Nodejs server using Arduino IDE
We will conver setting up esp8266 as a client to save sensor value to a remote nodejs server

Requirements: Esp8266 board
Table of contents:
- Setting up Nodejs server
- Deploying Nodejs server to heroku
- Reading DHT11 sensor value using Esp8266
- Sending data to Nodejs server
Setting up Nodejs server
yarn init -y or npm init -y will initialise node project. yarn add express will install expressjs package.
const express = require("express");
const app = express();// constants
const PORT = process.env.PORT || 8000;app.listen(PORT, () => console.log("Listening on port", PORT));
With the above code, Nodejs server is up and running. Now lets add routes to save sensor values. You can store values to database but I’ll be using a simple json file to store values.
const express = require("express");
const app = express();
const path = require("path");
const fs = require("fs");// constants
const DB_PATH = path.resolve("db.json");
const PORT = process.env.PORT || 8000;// middlewares
app.use(express.json());// routes
app.get("/", async (req, res) => {
  fs.readFile(DB_PATH, "utf-8", (err, jsonString) => {
    if (err) return console.log("Error in reading from db");
    let values = JSON.parse(jsonString);
    res.status(200).json({
      totalValues: values.length,
      values,
    });
  });
});app.post("/", async (req, res) => {
  fs.readFile(DB_PATH, "utf-8", (err, jsonString) => {
    if (err) return console.log("Error in reading from db");
    let body = req.body;
    let valuesArr = JSON.parse(jsonString);
    let obj = {
      temperature: body.temperature,
      humidity: body.humidity,
      timestamp: new Date(),
    };
    valuesArr.push(obj);
    fs.writeFile(DB_PATH, JSON.stringify(valuesArr), (err) => {
      if (err) return console.log("Error in updating db");
      res.status(200).json({
        message: "Values saved",
        value: valuesArr[valuesArr.length - 1],
      });
    });
  });
});app.listen(PORT, () => console.log("Listening on port", PORT));
Create a file named db.json with an empty array inside, we will write sensor values to this file.
Add a get and post route at listening to ‘/’. Post route handles data saving to json file.
Deploying Nodejs application to heroku
If you dont have heroku account, create one here. You can deploy up to 5 projects for free. Create a new app in the heroku dashboard, give any name you want.

Follow the steps you get to push the nodejs app to heroku.
🟡 Create a file named Procfile and the below content
web: node index.jsThis Procfile is a configuration file for heroku. Once the code is pushed, heroku runs the instruction provided in the Procfile.
🟡 Create .gitignore file and add node_modules, so that git doesn’t track node_modules folder. You can get more details about gitignore here.
heroku login
git init
heroku git:remote -a esp8266-nodejs
git add .
git commit -am "make it better"
git push heroku master
Run the above commands one by one.
heroku login : logs the user in
git init : initialises an empty git repository
heroku git: remote -a esp8266-nodejs : adds your local git repo to your project. I have given the name “esp8266-nodejs” for my application in heroku.
git add . : stages your code
git commit -am “make it better” : commits your staged contents
git push heroku master : pushes the code to heroku
Once this is done your nodejs application will be pushed to heroku. You can access the application by clicking on the button in the top right corner or by going to the link you get after pushing to heroku in the command line.
Once you visit heroku app link you will get an empty array as response as no data is present as of now.
Reading DHT11 sensor value
We will use DHT11 sensor to read temperature and humidity values.
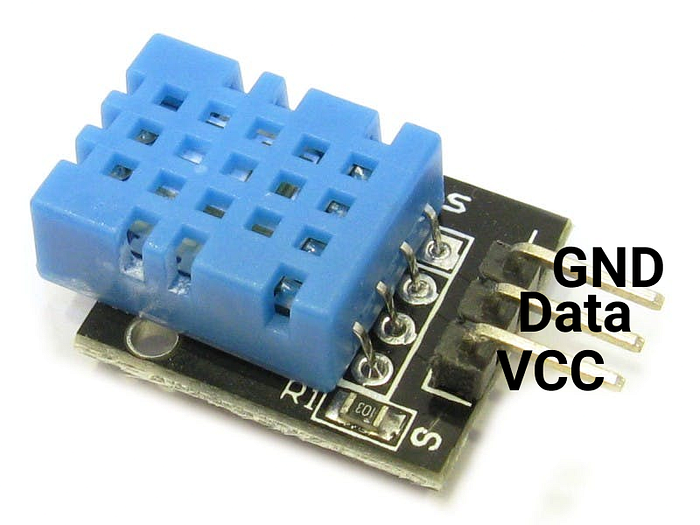
Connection(DHT11 — Esp8266):
VCC— 3.3V
GND — GND
Data — D1(GPIO5)
Connect Esp8266 to your system, this will power up esp8266.
Open arduino IDE and install dht11 library from Tools>Manage Library. Search dht11 in the search bar and install dht11 and its dependency libraries.
#include "DHT.h"#define DHTPIN 1     // what digital pin the DHT11 is conected to
#define DHTTYPE DHT11   // setting the type as DHT11DHT dht(DHTPIN, DHTTYPE);void setup() {
   Serial.begin(9600);
   dht.begin();
   delay(1000);
}void loop() {
  float h = dht.readHumidity();
    float t = dht.readTemperature();
    Serial.print("Humidity = ");
    Serial.print(h);
    Serial.print("%  ");
    Serial.print("Temperature = ");
    Serial.print(t);
    Serial.println("C  ");
  delay(2000);
}
Select the PORT where Esp8266 is connected and upload the code.
🟡 Open the serial monitor to see humidity and temperature values printed for every 2 seconds.
Sending data to Nodejs server
Now we have read the sensor values, lets send these values to remote Nodejs application running on heroku. To do that we need to connect Esp8266 to internet first.
#include <ESP8266WiFi.h>
#include <WiFiClient.h>const char *ssid = ""; //Enter your WIFI ssid
const char *password = ""; //Enter your WIFI passwordWiFiClient client;void setup() {
   delay(3000);
   Serial.begin(9600);
   WiFi.begin(ssid, password);
   while (WiFi.status() != WL_CONNECTED) {
    delay(500);
    Serial.print(".");
   }
   Serial.println("WiFi connected");
   delay(1000);
}
void loop(){
}
🟡 Above code connects Esp8266 to internet. Make sure you enter the right wifi name and password.
Lets send the sensor values to the server by making http calls.
#include "DHT.h"
#include <ESP8266WiFi.h>
#include <WiFiClient.h>
#include <ESP8266HTTPClient.h>
#include <ArduinoJson.h>#define DHTPIN 1     // what digital pin the DHT11 is conected to
#define DHTTYPE DHT11   // setting the type as DHT11DHT dht(DHTPIN, DHTTYPE);const char *ssid = ""; //Enter your WIFI ssid
const char *password = ""; //Enter your WIFI passwordconst char *server_url = "https://esp8266-nodejs.herokuapp.com/";// Nodejs application endpointStaticJsonBuffer<200> jsonBuffer;// Set up the client objet
WiFiClient client;
HTTPClient http;void setup() {
   delay(3000);
   Serial.begin(9600);
   dht.begin();
   WiFi.begin(ssid, password);
   while (WiFi.status() != WL_CONNECTED) {
    delay(500);
    Serial.print(".");
   }
   Serial.println("WiFi connected");
   delay(1000);
}void loop() {
  float h = dht.readHumidity();
  float t = dht.readTemperature();
  Serial.print("Humidity = ");
  Serial.print(h);
  Serial.print("%  ");
  Serial.print("Temperature = ");
  Serial.print(t);
  Serial.println("C  ");JsonObject& values = jsonBuffer.createObject();
  values["humidity"] = h;
  values["temperature"] = t;

   http.begin(client, server_url);
    http.addHeader("Content-Type", "application/json");
    int httpCode = http.POST(values);
    if(httpCode > 0){
      if (httpCode == HTTP_CODE_OK || httpCode == HTTP_CODE_MOVED_PERMANENTLY) {
          String payload = http.getString();
          Serial.print("Response: ");Serial.println(payload);
        }
    }else{
         Serial.printf("[HTTP] GET... failed, error: %s", http.errorToString(httpCode).c_str());
    }
    http.end();
}delay(5000);
}
We first create an http client object and use that to make http calls to the server endpoint. Server_url mentioned above is my heroku app endpoint, use yours there.
🗒 ️To construct json object we are using ArduinoJson library. Make sure you install it the same way you installed other libraries in arduino IDE.
Every 5 seconds Esp8266 will send sensor data to Nodejs server. You can change the rate of sending data by altering the delay in loop().
You can see the values by making a get request to the app endpoint from browser.
You can do lot more as microcontroller is connected to internet now. Hope this was a good start for you.
Thank yourself for learning something new
Stay Curious… Stay Creative…